
In this guide, I will walk you through all the steps needed to set up a node on Amazon’s Cloud Services. For this, we will be using a free ec2 instance.
The end result of this guide is your own node, that using the API allows you to query the Vechain Thor blockchain.
Before we start I would like to point out that only the selected 101 Authority nodes are validating the blockchain and will get rewards for this. However, for development purposes or those that want to query the blockchain without depending on an blockchain explorer, running your own Thor Node is a must.
Step 1: Setup our Amazon ec2 instance
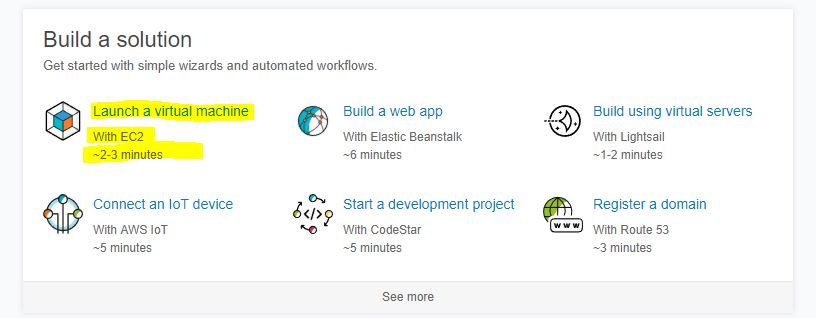
Go to https://aws.amazon.com/ and create an account. Once logged in select Launch a virtual machine.
Now we have to select an Amazon Machine Image (AMI), this is the template (combination of operating system, applications installed by default) that Amazon will use to start up our virtual server. Select Amazon Linux AMI 2018.03.0.
In the next step we have to choose an Instance type. Select the t2.micro type, since we can run this one for free and it has all the computing power we will need.
Go to Next: Configure Instance Details, on this screen we don’t have to change anything. Click on Next: Add Storage. Add a 10 GB General Purpose SSD Volume and go to Next: Add Tags. We can skip this section and go to Next: Configure Security Group.
Add the following settings so we can connect to our Node from a browser in a later stage of this tutorial:
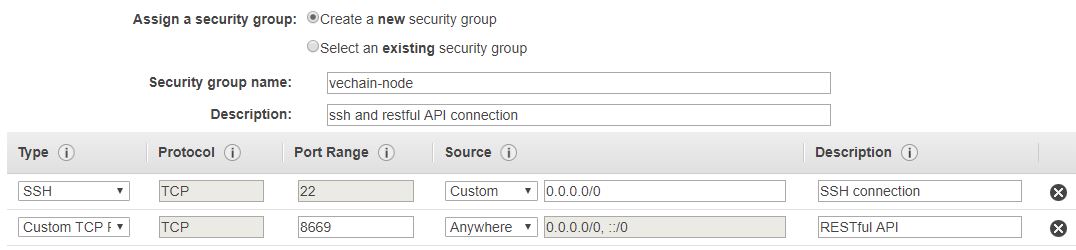
Add a Custom TCP Rule for port 8669 from Source Anywhere.
Now go to Review and Launch, double check if you didn’t miss any steps and click on Launch. After clicking Launch a popup will come up asking to create a key pair.
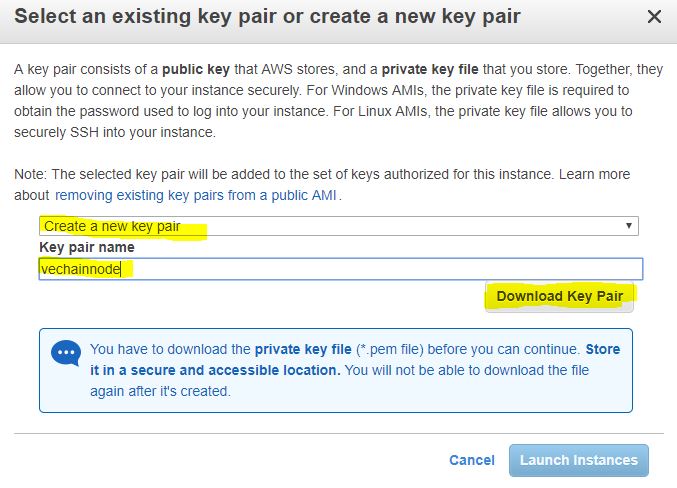
Select create a new key pair, name it something you can remember (I called mine vechainnode) and download the key pair (a .pem file) to your desktop. After this click on Launch Instances.
Give it one or two minutes and you should see that you now have a running ec2 instance. Good job and welcome to the Cloud!

Please note the Public DNS (IPv4) address, we will need this in the next step.
Step 2: Connect to the instance
To set up everything we will make use of SSH to send commands to our instance. For this we will use an SSH client called PuTTY. Download and install PuTTY by going to https://www.putty.org/.
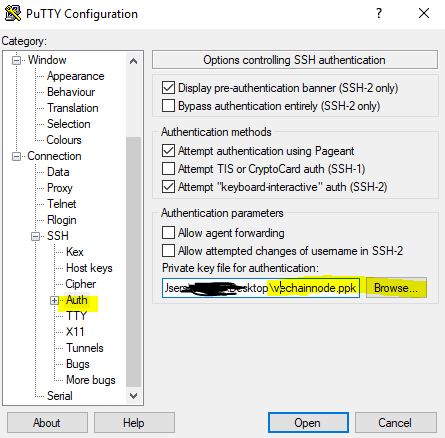
We now first have to convert our downloaded .pem key to a .ppk key that is useable by PuTTY.
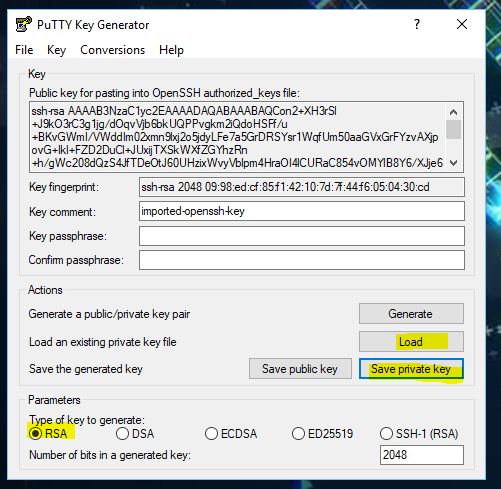
- Start PuTTYgen (Start > All Programs > PuTTY > PuTTYgen)
- Under Type of key to generate, choose RSA.
- Choose Load. By default, PuTTYgen displays only files with the extension .ppk. To locate your .pem file, select the option to display files of all types.
- Choose to Save private key to save the key in the format that PuTTY can use.
- PuTTYgen displays a warning about saving the key without a passphrase. Choose Yes.
- Specify the same name for the key that you used for the key pair (for example, my-key-pair). PuTTY automatically adds the .ppk file extension.
Your private key is now in the correct format for use with PuTTY.
Now start PuTTY. Under Session > Host Name fill in the Public DNS (IPv4) of your EC2 Instance. Under Connection > SSH > Auth add the private key we just created.
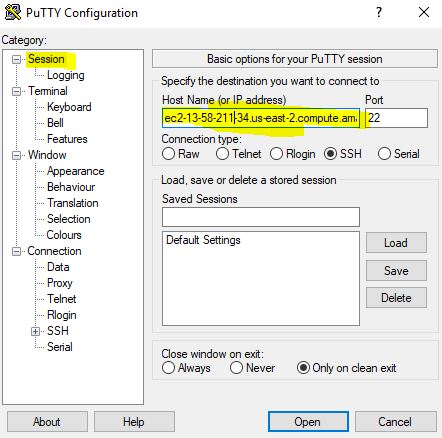
If done correctly, a command prompt will now open asking you for a login name, fill in:
ec2-user
Congrats, you are now logged in to your ec2 instance!
Step 3: Install everything
The first thing we do is update all the programs that are currently installed on the instance so we have the most recent version of everything. Type the following command into PuTTY:
sudo yum update
This will take a while, once finished install C on your virtual machine:
sudo yum install gcc
and after that install GIT.
sudo yum install git
Now we will install Go. Go is a popular open source programming language developed by a team at Google. Vechain is build using Go so we will need to install Go before we can continue. For more information on Go check out https://golang.org/.
First we download the latest install file of go to our instance:
wget https://dl.google.com/go/go1.13.5.linux-amd64.tar.gz
Extract our downloaded install files to /usr/local/
sudo tar -C /usr/local -xzf go1.13.5.linux-amd64.tar.gz
If succeeded your /usr/local folder should now have a go folder inside:

Set the path to go:
export PATH=$PATH:/usr/local/go/bin
and test to see if go is working:
go version
And it should display the version you have installed.
Set up the following file structure in which we will install the Vechain Thor source code: /usr/local/go/github.com/vechain/thor/
cd /usr/local/go/
sudo mkdir github.com
cd github.com
sudo mkdir vechain
cd vechain
Now we can use Git to get the thor source files of Github and install them on your local instance.
sudo git clone https://github.com/vechain/thor.git
Step 3: Build Thor
We are ready to start building Thor. Move into the just created thor folder and install all needed dependencies.
cd thor
Install all dependencies
make depSwitch to the root account so we can build Thor:
sudo su
and make sure you have defined where we have Go installed for the root account:
export PATH=$PATH:/usr/local/go/bin
All we need to do now is run the following command to build Thor:
make
If successful you will get the following message:
![]()
Step 4: Running Thor
Switch to normal account to run Thor:
su ec2-user
and start our node (make sure to select main or testnet here):
bin/thor --network main --api-addr 0.0.0.0:8669 &
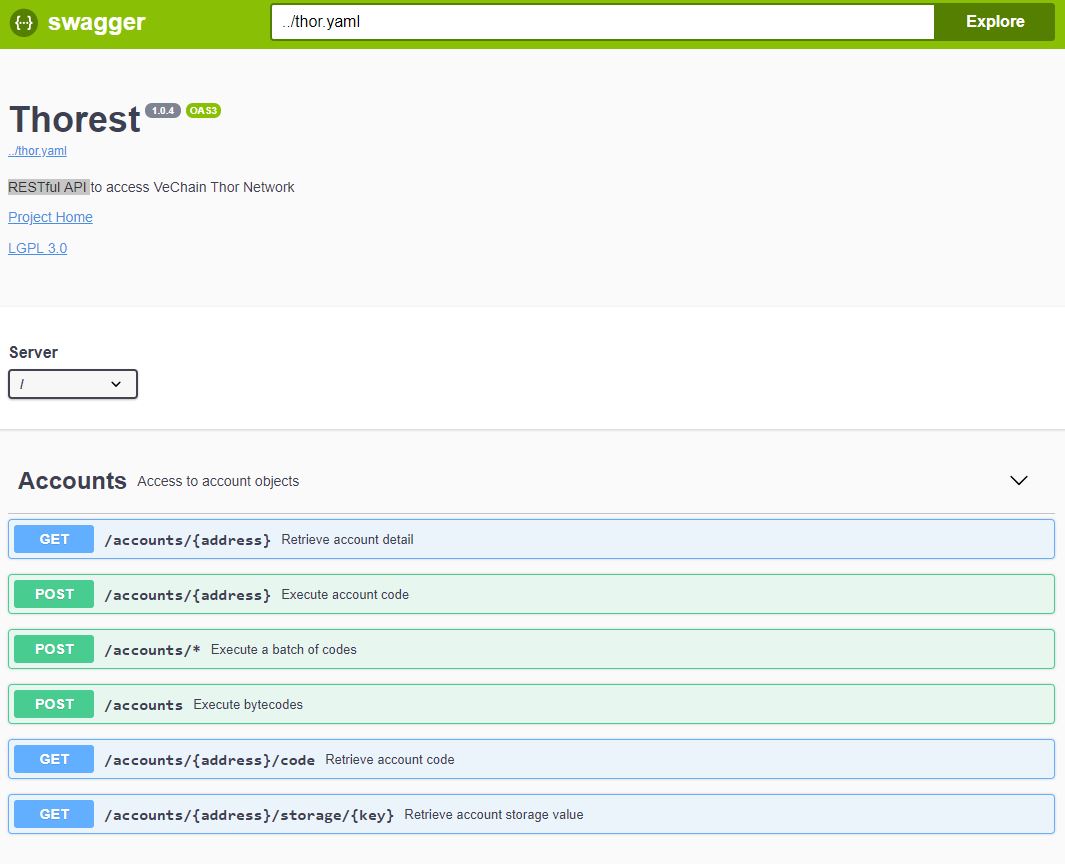
Step 5: Connect to the API
To connect to your API go to your public ip:8669 and it should load:
Bonus: Starting and stopping your node
Free Amazon accounts have a monthly limit, so its best to stop your node when you don’t need it. From your Amazon EC2 Management Console you can start and stop your instance by going to Actions > Instance State > Start or Stop.
If you no longer need your instance you can terminate it from here as well.
Bonus: Updating your Thor Node
To update enter the directory in which you have installed thor:
cd /usr/local/go/github.com/vechain/thor/
After that pull all changes using git:
git pull https://github.com/vechain/thor.git
And make the new build:
make


")